Tuesday, October 29, 2013

Artist Trading Cards

I've been intrigued by mixed media artwork recently, but I haven't done much in it.  Mostly, I feel a little overwhelmed by all the possibilities and it can be hard to branch out and just experiment and play. 

I met a lady at one of my art classes here in Scotland and now we get together once a week and do art.  She does a lot of mixed media work and artist trading cards (ATC's).  Since doing art together, I've been trying to do some mixed media collageI think I get a little too random, but it's all about experimentation, right?

Today, she was working on a set of ATC's with the theme of "doors" and I tried to do some as well.  


 ATC's have a standard size of 2.5" x 3.5", so they're pretty small and don't need to take days to finish a piece, which is nice for me.  I had fun doing these.  This one is on recycled cardboard from a cereal box and I used some paper scraps, washi tape, marker and pen. I was kind of going for an old, wooden door.  


This one is a bit simpler, also using some washi tape, cut up paper and marker and pen.


I can see why people love doing these so much, I might find myself doing some more pretty soon!

Monday, October 28, 2013

Tomatoes!

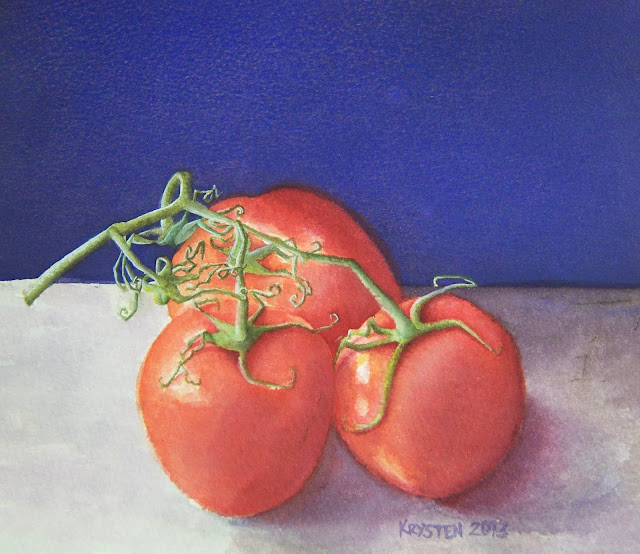
Last week at the grocery store, I bought some tomatoes that weren't quite ripe.  They had to sit for a few days to ripen and during that time, I noticed the curly, dying vines from two tomatoes that were plucked from this particular vine.  I thought it would make a fun still life, so I started drawing them from life.  I don't do a lot of my art from life, I mostly work from photos, only because I'm a slow worker.  Painstaking details, I wish I could work faster and looser, but anyway.

Between the drawing and painting stages, my fiance had eaten two of the three tomatoes, so when I started painting them, I had to do a bit of guessing on the color and highlights, haha. But it came out alright, not quite what I was hoping for though.  I don't think I used the best quality paper, I'm not happy with how some of the color bled and blended. But it was a fun little project. 

 Tomatoes, 7"x8" watercolor on paper

Chinese Painting Workshop

This past weekend at the Scottish National Gallery, they had a Chinese Ink Painting workshop which I was really excited to attend.  I did Chinese painting in college and I adored it, and was thrilled to try it again.  The class was originally for October 12, but it was full, so they ran a second class on the 26th, which I was lucky to get into. 

We had the same problem at my college, the class was only offered once a year and it always filled up right away.  We had a professor from China who was a famous artist there.  Our supplies all came from China, which I still have...beautiful brushes, bottled ink, stick ink, ink stone, Chinese watercolors and rice paper.  Unfortunately, all my stuff is back at my parents house in the US, there was only so much I could bring with me overseas.  

There is a Chinese grocery store that I go to a lot here, (I love making my own wontons and dumplings and miso soup) and they have a small selection of art supplies, so today I went in and bought some ink and a brush to work with until I can get my supplies from home. 


I really love the smell of Chinese ink...and oil paint.  Stinky art supplies are the best! They smell like art :)

So here are some of my practice drawings from the class. We were working on plum trees and blossoms, and we had to learn all the brush strokes for flowers, branches, and how to fill them in. 


 And then we were given the good rice paper and got to paint the whole composition. 

 Plum branch and blossoms, ink and watercolor on rice paper, 13"x13".

Sunday, October 27, 2013

Latest Etsy sale

I always get really excited when I have a sale in my Etsy shop.  I've been open a year, and besides a few sales from my friend, I've had exactly 2 sales from strangers.  I would really love to get that number to go up, so I'm going to share the latest drawing I did.  I do drawings of wedding gowns and watercolor paintings of bouquets and centerpieces.  I've had one bouquet sale and this most recent one was a gown sale. 


This order was for a drawing of both the front and back of the gown, and I took a photo of just the front by itself after I completed it. I love drawing these dresses, I find drawing and shading all the folds in the fabric really satisfying.  I hope you like! 

If you're interested in having a drawing or painting done for you, check out my Etsy shop. :)

Wednesday, October 9, 2013

Witches and Wicked Bodies class

The witches art class I was taking at the Scottish National Gallery is now over, but it was such a great class.  The two teachers we had showed us some different and really fun techniques for art making.  Some of my favorites from the class I'm listing here.


My first and favorite is the watercolor painting I did of my cat, Shinobi.  He is a gorgeous black cat, perfect model for a witch's familiar.  

Watercolor on paper (stained with tea to give it an aged look) roughly 6 3/4"x9". 


Some fun with owls! This was some simple printmaking and I just drew the owl into a piece of foam, inked it up and stamped on paper.  The owl was based on an owl in one of the prints in the Witches exhibition.


I really love this owl, and I think he would make a nice Halloween card.  I stained this paper with tea for an aged look and used a swirly stencil and some brown tinged paint on the background. I then took a circle stencil to wipe out some color to make the moon behind the owl and used a little white pastel pencil around the edges to make it stand out. The owl and tree branch are black watercolor paint. I cut the owl out in the shape of an oval and adhered it to black paper.


Found an interesting photo of a crow and drew it on the orange paper and just doodled designs into him.


This bird guy I just love. I pretty much copied him directly from one of the prints from the exhibition.  He was a small part of a larger print full of strange and wicked creatures.  I drew him larger and colored him in. Love! He was also painted on tea-stained watercolor paper. 7 3/4"x9"


Then we did some paper cuts! I used the bird again because I just love him and he made a great paper cut. I cut him out with scissiors and an exacto knife and glued him to the red paper so he stands out. Then glued the red paper to the black. 7 3/4 x 4 3/4"


Speaking of papercuts, here is another one.  I cut the tree and it's black border out of a piece of black paper and glued it to the red for contrast. 5.5"x5.5"


The little rabbit was the first exercise we did in paper cutting. We had one minute to cut the rabbit out with scissors without drawing him first. It was like drawing with the scissors. 


Batty printmaking. We used a technique for monoprinting I hadn't done before. Instead of drawing on the plexi and then printing the image from the plexi onto the paper, we put a coat of ink on the plexi and placed paper on top, without smoothing down. We drew the image onto the paper using a pencil and when you're done, you lift up the paper and you have the image printed in ink on the opposite side.  That's how I got the top picture of the bat.  The bottom image is the "ghost print" and after you get your first image, you lay down another sheet of paper on top of where you drew and rub it. When you lift the paper, you're left with the "ghost". 


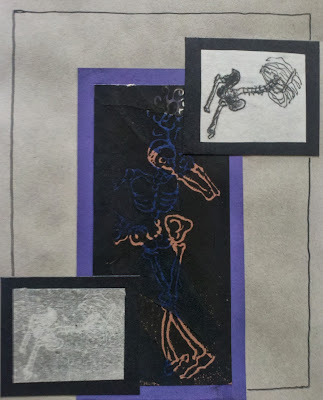
Fun with skeletons. I carved a stamp out of foam for the large skeleton and printed him on some collaged bits of paper. The small skeleton parts were prints done the same as the bats.


More skeleton prints.  The two fainter prints on the bottom picture came from when I was transporting the prints home. They hadn't dried completely and I wrapped them in newsprint paper for safety. When I took the prints out so they could finish drying, they had printed onto the newsprint. I thought it was pretty cool. 


Some more monoprinting. I did the print of the woman and colored her necklace and earrings with watercolor. I had done the print of the skeletal thing behind her and didn't know what to do with him so I stuck it behind her. I like it!


Another monoprint and it's ghost.  I copied this witchy person and the cat from an original print in the show, but in the original there were two other figures, and the cat was sitting on one of their shoulders.  I just liked this guy so I put him there alone with the cat.


Lastly, this is a little block print I did a long time ago for part of a school project. It actually had to do with Henry VIII and his love of chopping people's heads off, including some of his wives. I just found it and thought it fit the witchy theme.  3"x4"


We made an artists book in the class to put all our artwork in, but I haven't finished that part yet. I used a lot of delicate dried plants on mine and they're falling off. I need to fix the book and put it all back together. I'll add that at another time. For now, I hope you enjoyed this!

Latest fun crafty project

We live in a furnished apartment, and among the many things it came with, drink coasters was one of them. Ugly, boring, plastic drink coasters.  Money is a little tight, not bad but going out to buy pretty new coasters when we already had some ugly useful ones wasn't a priority. BUT buying supplies to MAKE my own coasters? Well, that's a different story ;-) I had way too much fun making these and photographing different drinks on the finished products!

I bought some regular white roughly 4x4" ceramic tiles from the home improvement store in my town and some craft self-adhesive cork backing.  To adhere the designs to the tile I used Mod Podge, which is a brand of craft glue I brought with me from the US. To seal it completely, I used a clear coat, waterproof spray sealer. 


This tile's design is my own. I had the drawing on a piece of tracing paper that I did for another mini painting. I had painted the old sketch and outlined in black ink for fun. It was the perfect size to make the first experiment coaster. 


These ones are made from a piece of decorative paper I kept from when someone gave me a bouquet of flowers.  The flowers were wrapped in the paper and I always keep pretty stuff like that for projects like this. I just traced the outline of the tile around the parts I liked, cut them out and glued them down to the tile.


The sticky-backed cork was the perfect backing for these guys.


                                              Great for holding a glass of vino...


Some water.....


                                          Tea or coffee...


Or some nice, warm sake!

Finally Finished.

For anyone still interested in these freakin daisies, I have finally finished. ;-) It really didn't take me too long to do the actual painting, which is why it is strange it took a year and a half to get it done. Well, now it's complete and we can all move on with our lives!


I can't honestly say this is my favorite painting I've ever done, it was really more of an experiment for me.  I'm usually very tight and detailed and I wanted this one to be a little more free.  

When I was doing the background, I had the flowers outlined in masking fluid so the background wouldn't wash into themWhen I decided to give the background a very spattery look, it started dripping into the flowers and I thought, "oh no!" But then I just decided to go with it.  I knew the spatter and drips would show through when I painted the flowers, and thought it might give it an interesting effect.

I'm also not thrilled with the composition. I don't know what it is...but either way, it was fun to paint and I love the colors of gerber daisies. I'm sure I'll be doing more in the future.